-
Cheesy Tuna Melt Waffles for Brunch Lovers
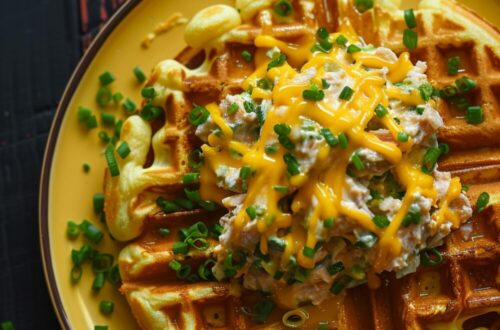
Do you remember those classic tuna sandwiches from your school days? Well, we’re here to take that nostalgia trip and add a little twist with these Cheesy Tuna Melt Waffles. Imagine the satisfying crunch of a savory cheddar and scallion waffle topped with creamy tuna salad and melty cheese. It’s like a comforting food hug on a plate!
Who knew that a childhood lunch favorite could grow up to become the star of your brunch menu? The combination of fluffy waffles with the savory tuna melt is pure magic. Think of it as an elevated, sophisticated version of those days when you secretly loved your smelly tuna sandwich, despite the occasional teasing. Now, it’s time to proudly embrace that love with a gourmet flair.
If you’re anything like me, you love the idea of diner-style comfort food with a touch of elegance. These waffles bring all the retro diner vibes with none of the cafeteria flashbacks. So, let’s whip up some Cheesy Tuna Melt Waffles and turn your brunch into a feast of flavors and fun!
Ingredients:
Waffles:
- 1 cup all-purpose flour
- 1 teaspoon baking powder
- 1/2 teaspoon baking soda
- 1/4 teaspoon salt
- 1/8 teaspoon freshly ground pepper
- 1/4 cup shredded cheddar
- 1/4 cup sliced green onions
- 1 cup buttermilk
- 3 tablespoons butter, melted
- 1 large egg

Tuna Melt:
- 1 savory scallion and cheddar waffle
- 1-2 tablespoons tuna salad
- Shredded cheddar
- Sliced green onions

How to Make It:
- Preheat your waffle iron.
- In a bowl, mix together the dry ingredients and the shredded cheddar.
- In another bowl, whisk together the melted butter, milk, and egg. Add the wet ingredients to the dry, stirring until just combined. Stir in the green onions.
- Grease your waffle iron if needed and cook waffles according to waffle iron instructions or until the waffles are golden brown and crispy. Enjoy as is, or use in the tuna melt waffle recipe.
- Preheat the oven to 425°F. Top waffles with a bit of tuna salad and a generous amount of shredded cheddar. Bake in the oven until the cheese is bubbly and melted. Top with sliced green onions and sesame seeds if desired and enjoy hot.
Helpful Hints:
- Use freshly shredded cheddar for the best melting quality.
- Pre-cook the tuna salad for extra flavor.
- Serve immediately for the best texture.
-
Cheesy Heaven: Cheeseburger and Egg Grilled Cheese Recipe
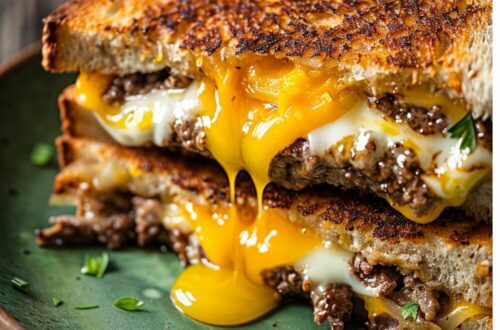
The ultimate cheesy brunch: buttery toasted country slices sandwiching two all-beef patties, an over-easy egg, and ALL the cheese! April is Grilled Cheese Month (who invents these things?!) and even though I’m not really about random food days/months, I’m all about grilled cheese, so bring it on! We couldn’t let the month pass by without eating grilled cheese, so we celebrated with this big breakfast monster: crusty country bread, two beef patties, an over-easy egg, and so much cheese.
This guy is essentially a patty melt: a burger on bread instead of in a bun. Patty melts are classic diner food and I’m sad to say that I’ve never actually had one in a diner. I love diners and diner food in general, so this is my kind of grilled cheese.
Ingredients:
- 6 oz lean ground beef
- Salt and freshly ground pepper
- Oil for the pan
- 2 slices of your favorite bread
- 1-2 tablespoons butter
- 1 over-easy egg
- 1 cup shredded cheese of choice

How to Make It:
- Divide the ground beef into two and pat into very thin patties, the shape of your bread. Season both sides with salt and pepper. Heat a heavy-bottomed pan over high heat and add a bit of oil. Cook the patties, pressing down to get a good sear, until very brown, about 1-2 minutes. Flip and cook the other side. Remove from the pan.
- Build your sandwich, buttered bread facing outwards: bread, cheese, burger, cheese, burger, cheese, egg, cheese, bread.
- Grill on medium-low until golden brown and toasty and cheese is melted, flipping once. Enjoy!

Helpful Hints:
- For a perfectly over-easy egg, cook until the whites are set but the yolk is still runny. It adds a delicious creaminess to the sandwich.
- If you like your burger patties well-done, cook them for an additional minute on each side.
- Experiment with different cheeses for a unique flavor profile. Cheddar, mozzarella, or pepper jack all work wonderfully.
-
Decadent Fairfax Breakfast Sandwich
Start your day with a breakfast sandwich that’s pure indulgence: the Fairfax Breakfast Sandwich. This luxurious creation features toasted brioche, soft scrambled eggs, melted American cheese, sriracha mayo, and sweet caramelized onions. It’s the ultimate breakfast treat for those who love a decadent start to their day.
If you’ve never experienced the Fairfax, you’re in for a delightful surprise. This recipe brings the gourmet sandwich experience right to your kitchen. The only slightly time-consuming part is the caramelized onions, but trust me, they’re worth every minute. Make a batch ahead of time and this sandwich will come together in a flash, even on a busy morning. Elevate your breakfast game with this deliciously decadent creation!
Ingredients:
- 1/2 tablespoon oil
- 1 onion, thinly sliced
- 1 tablespoon mayonnaise
- 1-2 teaspoons sriracha
- 3 large eggs
- 1 tablespoon cold butter
- Salt, to taste
- 1-2 tablespoons sliced chives
- 1 slice American cheese
- 1 brioche bun, lightly toasted

How to Make It:
- Caramelize the Onions: In a small saucepan, heat up oil over medium-high heat. Add the onions, stir and turn the heat down to low. Cook, stirring often, until caramelized and soft, about 30-45 minutes. When the onions are almost done cooking, mix together sriracha and mayo. Set aside.
- Scramble the Eggs: In a non-stick frying pan, crack the eggs and add the cold butter. Using a heatproof spatula, stir the eggs until the yolks and whites are homogenous. Cook the eggs over medium-high heat, stirring constantly and moving on and off the heat, until the eggs start to set. When soft and set, season with salt and stir in chives. Remove from the heat.
- Assemble the Sandwich: Toast the bun and spread sriracha mayo on the bottom bun. Top with the eggs, lightly melt the slice of cheese in a non-stick pan, and place it on top of the eggs. Add caramelized onions and the top bun. Enjoy immediately.

Helpful Hints:
- Caramelized Onions: Caramelizing onions takes time, but it’s worth the effort. You can make a large batch ahead of time and store them in the fridge for up to a week.
- Egg Scramble: Stir the eggs constantly over medium-low heat to get creamy and soft scrambled eggs. Remove from heat just before they are fully set to avoid overcooking.
- Brioche Toasting: For an extra crispy and buttery bun, toast the brioche in a pan with a little bit of butter until golden brown.
- Mayo Mix: Adjust the sriracha mayo to your spice preference. If you like it spicier, add more sriracha. For a milder taste, reduce the amount.
- Prep in Advance: Save time by preparing the sriracha mayo and caramelized onions the night before. This way, you can assemble the sandwich quickly in the morning.
- Serving Suggestion: Pair this sandwich with a side of fresh fruit or a light salad to balance the richness of the ingredients.
-
Bacon and Egg Breakfast Ramen
Ramen noodles might not be what you think of when you think of brunch, but to me, noodles are the perfect food, especially when paired with eggs. Eggs are my spirit food (noodles are too!). If there are eggs around, you best believe I’m going to be there. Some of the best eggs I’ve had have been in Japan and it’s no wonder because they take their eggs seriously there. The raw eggs in Japan are gorgeous: the yolks are a deep golden yellow and the whites are firm and tight. As in love as I am with the egg quality, I am even more in awe of the way they perfectly cook eggs.
This breakfast ramen doesn’t come with unlimited eggs, but it’s still a dream come true. It’s got chewy noodles tossed with a punchy, savory soy dressing, crispy soft sous-vide pork belly, and a tender slow-poached egg. A bunch of extra umami-filled friends gather on top – seaweed, green onions, katsuobushi, sesame seeds – ready to be mixed into the party. Carbs, meat, eggs: it’s everything you want in a brunch bowl.
Bacon and Egg Breakfast Ramen Recipe
Serves: 1, scales infinitely
Prep Time: 10 minutes + pork belly cook time
Cook Time: 5-10 minutes
Total Time: 25 minutesIngredients:
Chili Oil:
- 1 tablespoon oil
- 2 cloves garlic, minced
- 1 tablespoon chili flakes
Soy Dressing:
- 2 cloves garlic, minced
- 1 tablespoon soy sauce
- 1 tablespoon mirin
- 1 tablespoon rice vinegar
- 1 tablespoon sesame oil
- 1 teaspoon sugar
- 1/2 teaspoon dashi granules
Noodles:
- 1 portion thick ramen noodles
- 3 slices pork belly (or crispy bacon)
- 1 slow poached egg
Garnish:
- Seaweed strips
- Sliced green onions
- Katsuobushi
- Toasted black sesame seeds

Instructions:
- Make Chili Oil:
Heat up 1 tablespoon of oil in a small pan over medium-low heat. Add the garlic and chili flakes and cook, stirring, until the mixture heats up and sizzles, about 1-2 minutes. Remove from the pan and set aside to cool. - Prepare Soy Dressing:
Mix together the soy dressing ingredients in a small bowl. Set aside. - Cook Noodles:
Cook the noodles according to the package and drain well. Toss with the soy dressing, to taste. Place the noodles in a shallow bowl and top with pork belly and a poached egg. - Garnish and Serve:
Garnish with seaweed strips, green onions, katsuobushi, and toasted black sesame seeds. Serve with a generous amount of chili oil. Mix and enjoy!

Helpful Hints:
- A lot of this can be made beforehand and held in the fridge. Make the chili oil and dressing the day before and hold in the fridge. The soft poached eggs can also be made the day before and heated up in a bowl of piping hot tap water while you’re cooking the noodles. The pork belly can be prepared the day before as well – sous vide it the day before, hold it in the fridge overnight, then slice it and sear it just before serving.
- If you haven’t heard of dashi granules/powder, it’s basically instant soup stock. You can find it in Asian grocery stores in the Japanese section. Katsuobushi is dried smoked bonito flakes – they add a punch of umami. You usually see it on okonomiyaki, takoyaki, and yakiudon. It’s not totally necessary in the recipe, but it is a nice bonus.
-
Brioche French Toast Recipe: The Ultimate Breakfast Treat
Introduction
French toast is the ultimate breakfast treat, and brioche French toast takes it to a whole new level. Imagine starting your day with a plate of soft, custard-y brioche French toast that’s crispy and golden brown on the edges. It’s like a warm hug on a plate! Whether it’s topped with summer-sweet peaches or caramelized nuts in the fall, brioche French toast is a delightful way to enjoy breakfast. If you haven’t tried it yet, now is the perfect time to make this luxurious breakfast treat.
Ingredients
- Bread: Brioche, of course! Fresh or stale, it’s the perfect choice for rich and tender French toast.
- Eggs: The essential ingredient for the custard. Ensure they are fully whisked to avoid any unincorporated bits.
- Cream and Milk: A mix of heavy cream and milk creates a luscious custard texture.
- Sugar: Adds sweetness and helps caramelize the toast’s exterior.
- Butter and Oil: For frying, combining both gives flavor and prevents burning.

How to Make Brioche French Toast
- Make the custard: In a shallow bowl, whisk together the eggs, cream, milk, and sugar until the mixture is smooth and the eggs are fully incorporated.
- Soak the brioche: Take your slices of brioche and soak them in the custard mixture, flipping once to ensure both sides are well-coated.
- Pan-fry: Heat a cast iron or non-stick pan over medium heat. Add a bit of oil and butter. When the oil and butter are hot, add the custard-soaked bread (let the excess drip back into the bowl) and cook until golden brown and crispy on the bottom side.
- Flip and cook: Gently flip the bread and continue to cook until the other side is golden and crisp. If needed, turn the heat up to medium-high to achieve a perfect golden brown finish.
- Serve: Serve the French toast immediately with your favorite toppings like butter, syrup, fruit, and powdered sugar.

Helpful Hints
- Mix Well: Ensure the custard is well-mixed to avoid stray egg bits.
- Use Butter and Oil: This combination prevents burning and adds flavor.
- Preheat the Pan: A hot pan ensures the first slice sizzles slightly.
- Start on Medium Heat: Begin on medium heat and finish on medium-high for the perfect crust and creamy inside.
- Soak the Brioche: Longer soaking results in a creamy custard middle. Adjust soaking time based on the bread’s freshness.
-
Chilaquiles: Tortillas and Cheese and Salsa for Breakfast
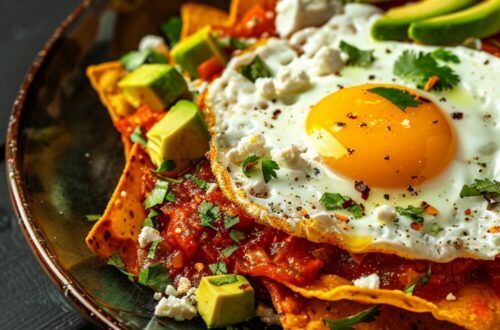
Looking for the ultimate breakfast that will fill your belly and warm your heart? Say hello to chilaquiles! This dish is a fiesta on a plate, perfect for breakfast, brunch, or any time you need a comforting meal. Imagine crispy, slightly tender tortilla chips bathed in savory salsa, topped with sunny side up eggs, and garnished with all the toppings your heart desires. If you haven’t tried chilaquiles yet, you’re in for a treat. Let’s dive into the deliciousness of chilaquiles and make your taste buds dance with joy!
What are chilaquiles?
Chilaquiles are like the breakfast superheroes of Mexico. Born out of the need to use up leftover tortillas, these magical creations involve cutting tortillas into quarters, frying them to crispy perfection, and then tossing them in warm salsa. The result? A dish that’s crispy, saucy, and utterly satisfying. Whether you prefer your chilaquiles topped with diced onions, cilantro, cream, queso fresco, or avocado, this dish has something for everyone. Plus, it’s the perfect way to start your day with a burst of flavor.
How to make chilaquiles
Chilaquiles can be as simple or as elaborate as you like. For the ultimate experience, we recommend making your own tortilla chips and salsa. Trust us, it’s worth the effort!
Ingredients:
- Tortillas/tortilla chips – old corn tortillas fry up into the best chips.
- Salsa – either homemade or store-bought, red or green.
- Toppings – fried eggs, cilantro, onions, jalapeños, sliced radishes, carnitas, tinga, avocado, crema, cheese, etc.

Instructions:
- Fry the tortillas: Cut up old tortillas into wedges and fry them in oil until they become crispy chips. Alternatively, use store-bought tortilla chips for convenience.
- Make the sauce: Simmer together blended tomatoes, onion, garlic, chipotle in adobo, and Mexican oregano until thick and aromatic.
- Sauce the tortillas: Add the chips to the sauce, stirring to coat every chip.
- Top the tortillas: Plate the chips and top with cilantro, onions, and fried eggs.
- Enjoy! Dig in and enjoy a bite of crispy tortilla, savory salsa, and creamy egg in every mouthful!

Helpful Hints:
- Use stale tortillas for frying to get the best texture.
- Customize your toppings based on what you have at home.
- Enjoy immediately for the best combination of textures.
-
Breakfast EBM: Eggs, Bacon, Mac & Cheese Symphony
Crispy bacon, cheesy mac, and softie eggs: the best breakfast combo ever? How’s 2024 going so far? We’ve been wandering around Tokyo, soaking up the relentless sunshine (except for the last two days of rain). The weather forecast here is freakishly accurate – if they predict rain at 2 pm, you better believe you’ll need an umbrella right on the dot.
Rainy days have kept us indoors, checking out new year’s sales. Found a cute noragi jacket for $30, and it’s perfect for the cold. Cold weather makes me hungry, and let’s just say I’ve been getting a bit squishy. It’s hard to resist all the good food here!
Every time we pass by a Doutor (like Starbucks but with more food), I see a giant photo of a cheesy tuna melt that looks irresistible. I haven’t given in yet, but who knows? Maybe we are the kind of people who go to Japan to eat tuna melts!?
Back to breakfast: I present you with EBM! It’s like EDM, but for breakfast lovers – extra cheesy mac and cheese, bacon bits, and soft-baked eggs. It creeps up on you like a good EDM track: the deep beat of the mac, the bass of the bacon, and the drop – the eggs on top. Breakfast and mac and cheese lovers, unite!
Ingredients:
- 4-6 slices thick cut bacon, chopped
- 2 cups dry macaroni or small pasta of choice (I used scoobi doo/cavatappi)
- 3 tablespoons butter
- 1/4 cup flour
- 2 1/2 cups milk
- 1/2 teaspoon salt
- 1/2 teaspoon pepper
- 2 cups grated cheese of choice (I used a mix of mozza and cheddar)
- Extra cheese for baking, if desired
- 4 large eggs

Helpful Hints:
- Use a mix of mozzarella and cheddar for the best cheesy flavor.
- Ensure your bacon is crispy for an added crunch.
- Make small wells in the mac & cheese for the egg whites to ensure they cook properly.

Instructions:
- Preheat the oven to 400°F.
- Fry the bacon until crispy, then set aside.
- Boil your pasta until al dente, according to the package instructions. Drain and set aside.
- In the same pot or a large sauté pan, melt the butter over medium heat. Add the flour and stir constantly for about three minutes, until smooth and incorporated.
- Pour in 1 cup of milk in a thin stream while whisking. It might start out lumpy, but keep whisking until smooth. Add the rest of the milk and whisk until smooth. Cook on medium heat, stirring occasionally, for about 10 minutes, until the sauce thickens.
- Remove from heat and add the salt, pepper, and cheese. Stir until the cheese is melted. Add the drained pasta and bacon and gently mix. Taste and adjust seasonings if needed. Place the mac and cheese in an oven-proof skillet.
- Make four small wells in the mac. Separate the egg whites from the yolks and pour the whites into the wells. Sprinkle cheese around the wells, if desired. Bake until the whites are almost set, about 10 minutes.
- Top the whites with the yolks and bake until the yolks are just starting to set, 2-3 minutes. Remove from the oven and enjoy!
-
Cheddar Scallion Biscuits: A Fluffy, Flavorful Treat
Extra Flaky Sky High Cheddar Scallion Biscuits Recipe
These cheddar scallion biscuits are incredibly flaky, flavorful, and easy to make. Perfect for breakfast, brunch, or as a snack, they are sure to become a family favorite. If you love biscuits, these sky-high, extra cheesy, and savory delights are just what you need. Follow this simple recipe to enjoy delicious, homemade biscuits that are perfect any time of day.
Ingredients:
- 2 cups all-purpose flour, plus more for dusting
- 1 tablespoon baking powder
- 1/4 teaspoon baking soda
- 1 teaspoon salt
- 1/4 teaspoon garlic powder
- 6 tablespoons unsalted butter, very cold
- 1 cup shredded cheddar cheese
- 1/3 cup thinly sliced scallions
- 1 cup buttermilk
- 1 large egg whisked with a splash of water, for egg wash

Helpful Hints:
- Use the largest holes on a box grater to grate the butter into the flour mixture for the best texture.
- Avoid twisting the biscuit cutter when cutting out the rounds to ensure they rise properly.

Instructions:
- Heat the oven to 425°F. In a large bowl, whisk together the flour, baking soda, baking powder, salt, and garlic powder.
- Using the largest holes on a box grater, grate the butter into the flour mixture. Use your fingers to toss the butter in the flour until the butter shreds are coated. Toss in the scallions and cheese.
- Add the buttermilk to the flour mixture and use a silicone spatula or wooden spoon to stir everything until a dough just comes together. Turn the dough onto a well-floured surface and lightly pat it into a 1/2 inch thick rectangle.
- Fold the bottom third of the dough up and then the top third of the dough down over the bottom third, as though you are folding a letter. Gently pat the dough down to 1/2 inch thick, then fold again, letter style. Repeat the patting and folding one last time, making sure your dough is about 1 inch thick.
- Use a floured biscuit cutter to cut out rounds from the dough, being sure not to twist the cutter when you remove the rounds. Gently pat the scraps together and cut until you’ve used up all the dough.
- Place the rounds, sides gently touching, on a baking sheet. Brush with the egg wash and bake for 13-15 minutes, or until golden brown.
-
Ultimate Huevos Rancheros Breakfast
Huevos rancheros might be the most ultimate breakfast out there. Fried eggs, warm crispy tortillas, refried beans, and salsa come together in a beautiful medley of flavors and textures. So satisfying and truly the best way to start the day.
Like most beloved breakfasts, there are many, many ways to make huevos rancheros and every family has their own way. That being said, all huevos rancheros plates include sunny side up eggs, salsa, and tortillas. This iteration is our ultimate huevos rancheros, and it’s absolutely one of my all-time favorite breakfasts. Making huevos rancheros from scratch is one of the most satisfying breakfasts you can make, and it’s so easy, whether you use fresh made or store-bought salsa.
What are Huevos Rancheros?
Huevos rancheros is a Mexican breakfast that consists of lightly fried tortillas, refried beans, sunny side up eggs, and salsa. It can be spicy or mild and dressed up with cheese, avocados, cilantro, and all the extra toppings. Huevos rancheros means “ranch style eggs” and essentially, it’s a super hearty breakfast that ranch/farm hands ate to keep up their strength throughout the day.
Ingredients:
- Salsa: Your favorite store-bought or homemade salsa, or make a simple homemade ranchero salsa with canned fire-roasted tomatoes, onion, and roasted green chile simmered in chicken broth.
- Beans: Refried beans, either homemade, leftover, or store-bought.
- Tortillas: Small corn tortillas lightly fried into tostadas, or use flour tortillas if preferred.
- Eggs: Sunny side up eggs with crispy edges and creamy yolks.
- Toppings and Sides:
- Avocados (sliced or guacamole)
- Cheese (Queso Fresco)
- Mexican rice
- Pico de gallo
- Sliced jalapeños
- Cilantro
- Carnitas, Barbacoa, or Birria (optional)

How to Make Huevos Rancheros
- Make the Salsa: In a saucepan, lightly fry chopped onions and add fire-roasted tomatoes, chopped chiles, broth, cumin, and oregano. Simmer until slightly thick and aromatic.
- Fry the Tortillas: Lightly crisp up the tortillas in hot oil until golden and crunchy on the edges.
- Fry the Eggs: Fry the eggs sunny side up with firm whites and creamy yolks.
- Assemble: Lay out the crisp tortillas and top them with some warm salsa. Add a fried egg and top with even more salsa. Finish with a bit of queso fresco and cilantro and add a side of refried beans.
- Enjoy: Dig in, making sure to get a bite of everything: crispy tortilla, savory salsa, and creamy egg!

Helpful Hints:
- Salsa: You can use your favorite salsa, either store-bought or homemade. Cooking store-bought salsa on the stove with added cumin and oregano can deepen the flavors.
- Beans: Refried beans add creaminess to the dish but are optional.
- Tortillas: Frying your own tortillas at home lets you control the texture.
- Eggs: Sunny side up eggs are classic, but cook them to your preference.
- Toppings: Customize with your favorite toppings and sides for added flavor and texture.
-
Full English Breakfast: A Hearty Start to Your Day
Bacon, sausages, eggs, tomatoes, mushrooms, toast, and beans all on one plate: is a Full English breakfast the most ultimate breakfast ever?
Confession: I’ve never had a real full English, at least not in England or anywhere in the world in fact, except right here, at home. But a couple of weeks ago, I was chatting with a friend from England, and the thing he missed the most was breakfast, specifically a Full English breakfast. He described the deliciousness for a good five minutes, but I wasn’t sold until I saw a photo. It was a giant plate and it looked AMAZING. I mean, it might have been because I was very hungry, but at the time, nothing looked better to my eyes. Thus started the Full English obsession.
What is a Full English Breakfast?
Sometimes called a fry up, a Full English is a hearty, hefty breakfast plate served in the UK and Ireland. Full English breakfasts are so popular that they’re pretty much offered throughout the day as all-day breakfast. A classic Full English breakfast contains sausages, back bacon, eggs, tomatoes, mushrooms, fried bread, and beans.
Ingredients:
- 4 links sausages (breakfast sausage preferred)
- 4 slices back bacon or Irish bacon
- 4 slices black pudding (optional)
- 1 cup mushrooms, halved or sliced
- 2 small tomatoes, halved
- 4 slices bread
- 4 eggs
- 1 can beans (Heinz preferred)

How to Make a Full English Breakfast
- Warm the Beans: Open the can of beans and warm in a small pot over low heat, stirring occasionally.
- Cook the Sausages and Bacon: While the beans are warming, cook the sausages over medium to medium-low heat until browned and cooked through, turning as needed. Push the sausages to one side and add the bacon, frying and flipping as needed.
- Cook the Black Pudding: If you’re having black pudding, add it to the pan and fry, flipping once. Keep everything warm in the pan over a low flame.
- Cook the Mushrooms and Tomatoes: In another pan, sear the mushrooms until brown and caramelized. Move to one side. Add the tomatoes, cut side down, and sear.
- Fry the Bread and Eggs: Move the meats from the pan and fry the bread in the drippings until golden and crisp. Cook the eggs in the pan that the mushrooms and tomatoes were in.
- Plate and Enjoy: Scoop the beans in the middle of the plate, then add the bacon at 1-2 o’clock, the sausages at 3 o’clock, then the eggs at 6. If you have black pudding, place it at 8 o’clock and fill the rest of the plate with the tomatoes at 11 o’clock and the mushrooms at 12. Fried bread can be tucked in wherever or placed on a side plate. Enjoy!

Helpful Hints:
- Sausages: Choose good sausages, preferably from your local butcher.
- Black Pudding: Not an absolute necessity but commonly included.
- English Bacon: Use back bacon made from pork loin with a bit of belly.
- Eggs: Typically served sunny side up but can be cooked to your preference.
- Tomatoes and Mushrooms: Use classic field tomatoes and simple brown mushrooms.
- Fried Bread: Thick-cut bread fried in a pan with oil or drippings, not toasted.

