Brunch and Light Meals
Enjoy our delicious brunch recipes and light meal ideas. From easy brunch dishes to quick lunch recipes, find healthy and satisfying light meals for any time of day.
-
Ham and Egg Brunch Pizza with Mini Sunny Side Up Eggs
Who said pizza isn’t for breakfast? Get ready to dive into this brunch-y pizza, topped with melty mozzarella, savory ham, and adorable mini sunny side up quail eggs.
There’s something about mini foods that just makes them irresistible. Maybe it’s their cute size or the way they seem to pack in even more flavor. Whatever it is, quail eggs have won my heart. They’re the perfect mini version of regular eggs, complete with rich yolks and speckled shells.
This breakfast pizza is a delight, combining all the best breakfast elements into one dish. I had a slight mishap the first time I made it – I forgot to oil my pizza pan, and the pizza stuck to it like glue. But no worries, I had extra dough in the fridge, so a quick redo saved the day. Pro tip: always oil your pan!
Ingredients:
- Oil for the pan
- 12 quail eggs
- 1 ball no-knead pizza dough or pizza dough of choice
- 1/3 – 1/2 cup pizza sauce, depending on how saucy you like your pizza
- 1 – 1.5 cups shredded mozzarella
- 6-8 slices thin deli ham
- Fresh basil, if desired
- Red pepper flakes, if desired

How to Make It:
- Preheat Oven: Arrange a rack in the middle of the oven and preheat to its hottest setting, 500°–550°.
- Cook Quail Eggs: In a non-stick pan, fry quail eggs sunny side up in a touch of oil, 1-2 minutes on medium heat. Set aside.
- Prepare Dough: Lightly oil a cast iron pan and dust lightly with cornmeal, if desired. Or, lightly oil and dust a baking sheet. Shape dough into a circle, pushing gently until fairly thin.
- Assemble Pizza: Spread on the sauce almost to the edges. Top generously with the shredded mozzarella and a sprinkling of red pepper flakes. Top with ham.
- Bake: Bake for 10-15 minutes, or until the crust is puffy, crisp, and slightly blistered.
- Top and Serve: Remove and top with the quail eggs and freshly torn basil. Enjoy immediately with extra red pepper flakes, if desired.
Helpful Hints:
- Pre-cook the Quail Eggs: Cooking the quail eggs beforehand ensures they are perfectly cooked and ready to top the pizza.
- Cornmeal for Texture: Dusting the pan with cornmeal adds a delightful crunch to the pizza crust.
- Fresh Basil: Add fresh basil after baking for a burst of flavor and color.
- Crispy Ham: Thinly sliced deli ham crisps up nicely, adding a delicious savory note to the pizza.
-
Cheesy Tuna Melt Waffles for Brunch Lovers
Do you remember those classic tuna sandwiches from your school days? Well, we’re here to take that nostalgia trip and add a little twist with these Cheesy Tuna Melt Waffles. Imagine the satisfying crunch of a savory cheddar and scallion waffle topped with creamy tuna salad and melty cheese. It’s like a comforting food hug on a plate!
Who knew that a childhood lunch favorite could grow up to become the star of your brunch menu? The combination of fluffy waffles with the savory tuna melt is pure magic. Think of it as an elevated, sophisticated version of those days when you secretly loved your smelly tuna sandwich, despite the occasional teasing. Now, it’s time to proudly embrace that love with a gourmet flair.
If you’re anything like me, you love the idea of diner-style comfort food with a touch of elegance. These waffles bring all the retro diner vibes with none of the cafeteria flashbacks. So, let’s whip up some Cheesy Tuna Melt Waffles and turn your brunch into a feast of flavors and fun!
Ingredients:
Waffles:
- 1 cup all-purpose flour
- 1 teaspoon baking powder
- 1/2 teaspoon baking soda
- 1/4 teaspoon salt
- 1/8 teaspoon freshly ground pepper
- 1/4 cup shredded cheddar
- 1/4 cup sliced green onions
- 1 cup buttermilk
- 3 tablespoons butter, melted
- 1 large egg

Tuna Melt:
- 1 savory scallion and cheddar waffle
- 1-2 tablespoons tuna salad
- Shredded cheddar
- Sliced green onions

How to Make It:
- Preheat your waffle iron.
- In a bowl, mix together the dry ingredients and the shredded cheddar.
- In another bowl, whisk together the melted butter, milk, and egg. Add the wet ingredients to the dry, stirring until just combined. Stir in the green onions.
- Grease your waffle iron if needed and cook waffles according to waffle iron instructions or until the waffles are golden brown and crispy. Enjoy as is, or use in the tuna melt waffle recipe.
- Preheat the oven to 425°F. Top waffles with a bit of tuna salad and a generous amount of shredded cheddar. Bake in the oven until the cheese is bubbly and melted. Top with sliced green onions and sesame seeds if desired and enjoy hot.
Helpful Hints:
- Use freshly shredded cheddar for the best melting quality.
- Pre-cook the tuna salad for extra flavor.
- Serve immediately for the best texture.
-
Cheesy Heaven: Cheeseburger and Egg Grilled Cheese Recipe
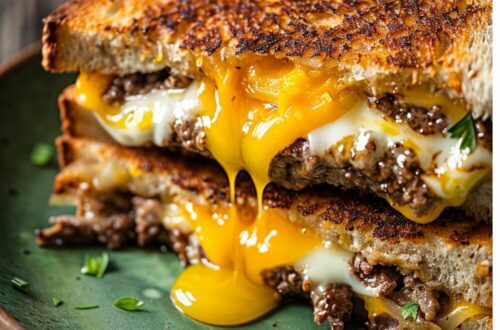
The ultimate cheesy brunch: buttery toasted country slices sandwiching two all-beef patties, an over-easy egg, and ALL the cheese! April is Grilled Cheese Month (who invents these things?!) and even though I’m not really about random food days/months, I’m all about grilled cheese, so bring it on! We couldn’t let the month pass by without eating grilled cheese, so we celebrated with this big breakfast monster: crusty country bread, two beef patties, an over-easy egg, and so much cheese.
This guy is essentially a patty melt: a burger on bread instead of in a bun. Patty melts are classic diner food and I’m sad to say that I’ve never actually had one in a diner. I love diners and diner food in general, so this is my kind of grilled cheese.
Ingredients:
- 6 oz lean ground beef
- Salt and freshly ground pepper
- Oil for the pan
- 2 slices of your favorite bread
- 1-2 tablespoons butter
- 1 over-easy egg
- 1 cup shredded cheese of choice

How to Make It:
- Divide the ground beef into two and pat into very thin patties, the shape of your bread. Season both sides with salt and pepper. Heat a heavy-bottomed pan over high heat and add a bit of oil. Cook the patties, pressing down to get a good sear, until very brown, about 1-2 minutes. Flip and cook the other side. Remove from the pan.
- Build your sandwich, buttered bread facing outwards: bread, cheese, burger, cheese, burger, cheese, egg, cheese, bread.
- Grill on medium-low until golden brown and toasty and cheese is melted, flipping once. Enjoy!

Helpful Hints:
- For a perfectly over-easy egg, cook until the whites are set but the yolk is still runny. It adds a delicious creaminess to the sandwich.
- If you like your burger patties well-done, cook them for an additional minute on each side.
- Experiment with different cheeses for a unique flavor profile. Cheddar, mozzarella, or pepper jack all work wonderfully.
-
Decadent Fairfax Breakfast Sandwich
Start your day with a breakfast sandwich that’s pure indulgence: the Fairfax Breakfast Sandwich. This luxurious creation features toasted brioche, soft scrambled eggs, melted American cheese, sriracha mayo, and sweet caramelized onions. It’s the ultimate breakfast treat for those who love a decadent start to their day.
If you’ve never experienced the Fairfax, you’re in for a delightful surprise. This recipe brings the gourmet sandwich experience right to your kitchen. The only slightly time-consuming part is the caramelized onions, but trust me, they’re worth every minute. Make a batch ahead of time and this sandwich will come together in a flash, even on a busy morning. Elevate your breakfast game with this deliciously decadent creation!
Ingredients:
- 1/2 tablespoon oil
- 1 onion, thinly sliced
- 1 tablespoon mayonnaise
- 1-2 teaspoons sriracha
- 3 large eggs
- 1 tablespoon cold butter
- Salt, to taste
- 1-2 tablespoons sliced chives
- 1 slice American cheese
- 1 brioche bun, lightly toasted

How to Make It:
- Caramelize the Onions: In a small saucepan, heat up oil over medium-high heat. Add the onions, stir and turn the heat down to low. Cook, stirring often, until caramelized and soft, about 30-45 minutes. When the onions are almost done cooking, mix together sriracha and mayo. Set aside.
- Scramble the Eggs: In a non-stick frying pan, crack the eggs and add the cold butter. Using a heatproof spatula, stir the eggs until the yolks and whites are homogenous. Cook the eggs over medium-high heat, stirring constantly and moving on and off the heat, until the eggs start to set. When soft and set, season with salt and stir in chives. Remove from the heat.
- Assemble the Sandwich: Toast the bun and spread sriracha mayo on the bottom bun. Top with the eggs, lightly melt the slice of cheese in a non-stick pan, and place it on top of the eggs. Add caramelized onions and the top bun. Enjoy immediately.

Helpful Hints:
- Caramelized Onions: Caramelizing onions takes time, but it’s worth the effort. You can make a large batch ahead of time and store them in the fridge for up to a week.
- Egg Scramble: Stir the eggs constantly over medium-low heat to get creamy and soft scrambled eggs. Remove from heat just before they are fully set to avoid overcooking.
- Brioche Toasting: For an extra crispy and buttery bun, toast the brioche in a pan with a little bit of butter until golden brown.
- Mayo Mix: Adjust the sriracha mayo to your spice preference. If you like it spicier, add more sriracha. For a milder taste, reduce the amount.
- Prep in Advance: Save time by preparing the sriracha mayo and caramelized onions the night before. This way, you can assemble the sandwich quickly in the morning.
- Serving Suggestion: Pair this sandwich with a side of fresh fruit or a light salad to balance the richness of the ingredients.
-
Bacon and Egg Breakfast Ramen
Ramen noodles might not be what you think of when you think of brunch, but to me, noodles are the perfect food, especially when paired with eggs. Eggs are my spirit food (noodles are too!). If there are eggs around, you best believe I’m going to be there. Some of the best eggs I’ve had have been in Japan and it’s no wonder because they take their eggs seriously there. The raw eggs in Japan are gorgeous: the yolks are a deep golden yellow and the whites are firm and tight. As in love as I am with the egg quality, I am even more in awe of the way they perfectly cook eggs.
This breakfast ramen doesn’t come with unlimited eggs, but it’s still a dream come true. It’s got chewy noodles tossed with a punchy, savory soy dressing, crispy soft sous-vide pork belly, and a tender slow-poached egg. A bunch of extra umami-filled friends gather on top – seaweed, green onions, katsuobushi, sesame seeds – ready to be mixed into the party. Carbs, meat, eggs: it’s everything you want in a brunch bowl.
Bacon and Egg Breakfast Ramen Recipe
Serves: 1, scales infinitely
Prep Time: 10 minutes + pork belly cook time
Cook Time: 5-10 minutes
Total Time: 25 minutesIngredients:
Chili Oil:
- 1 tablespoon oil
- 2 cloves garlic, minced
- 1 tablespoon chili flakes
Soy Dressing:
- 2 cloves garlic, minced
- 1 tablespoon soy sauce
- 1 tablespoon mirin
- 1 tablespoon rice vinegar
- 1 tablespoon sesame oil
- 1 teaspoon sugar
- 1/2 teaspoon dashi granules
Noodles:
- 1 portion thick ramen noodles
- 3 slices pork belly (or crispy bacon)
- 1 slow poached egg
Garnish:
- Seaweed strips
- Sliced green onions
- Katsuobushi
- Toasted black sesame seeds

Instructions:
- Make Chili Oil:
Heat up 1 tablespoon of oil in a small pan over medium-low heat. Add the garlic and chili flakes and cook, stirring, until the mixture heats up and sizzles, about 1-2 minutes. Remove from the pan and set aside to cool. - Prepare Soy Dressing:
Mix together the soy dressing ingredients in a small bowl. Set aside. - Cook Noodles:
Cook the noodles according to the package and drain well. Toss with the soy dressing, to taste. Place the noodles in a shallow bowl and top with pork belly and a poached egg. - Garnish and Serve:
Garnish with seaweed strips, green onions, katsuobushi, and toasted black sesame seeds. Serve with a generous amount of chili oil. Mix and enjoy!

Helpful Hints:
- A lot of this can be made beforehand and held in the fridge. Make the chili oil and dressing the day before and hold in the fridge. The soft poached eggs can also be made the day before and heated up in a bowl of piping hot tap water while you’re cooking the noodles. The pork belly can be prepared the day before as well – sous vide it the day before, hold it in the fridge overnight, then slice it and sear it just before serving.
- If you haven’t heard of dashi granules/powder, it’s basically instant soup stock. You can find it in Asian grocery stores in the Japanese section. Katsuobushi is dried smoked bonito flakes – they add a punch of umami. You usually see it on okonomiyaki, takoyaki, and yakiudon. It’s not totally necessary in the recipe, but it is a nice bonus.

